Employing the tracking code in WooCommerce via GTM

Employing the tracking code in WooCommerce via GTM
A guide for setting up GTM for e-shops in WooCommerce.
- create an account at https://tagmanager.google.com/#/home
- add your website. Tag Manager will generate for you a code from which to take your ID. Example: GTM-XXXXXX
- insert your GTM ID in WooCommerce administration in plugin DuracellTomi’s Google Tag Manager for WordPress. For more information, see the article on this plugin.
- in the plugin settings, tick off all the options in Integration – WooCommerce

- in Tag Manager create a new tag for tracking clicks ”Affil Dognet – click tracking“ as custom HTML where you insert the click tracking code. Trigger is every page (All pages)
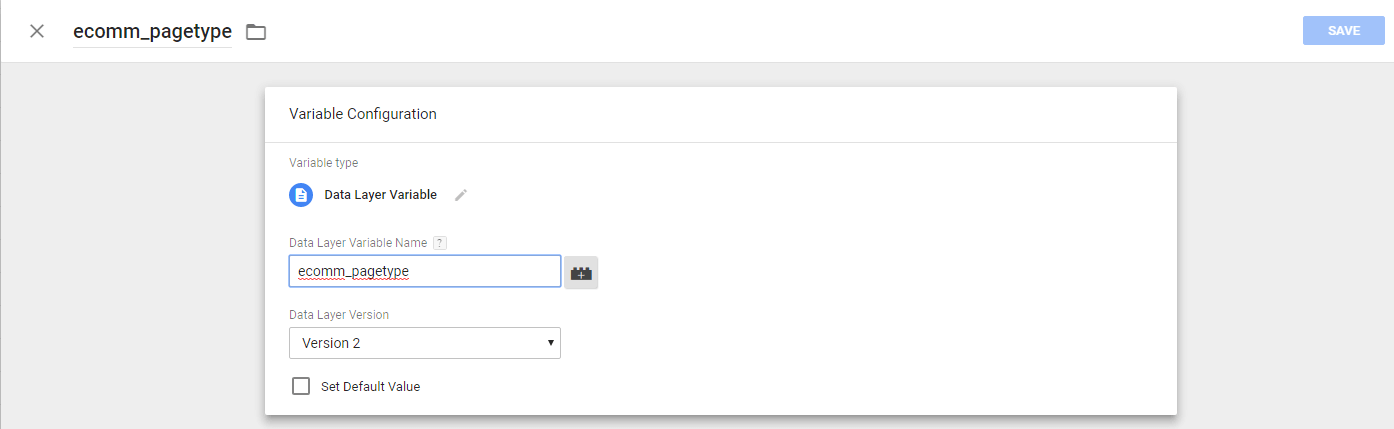
- in Tag Manager create a new variable (Variable). The name “ecomm_pagetype“. The variable is of Data Layer Variable type. The Data Layer Variable Name is ”ecomm_pagetype“
- proceed as in point 6 to create “transactionId” variables where the Data Layer Variable Name is ecommerce.purchase.actionField.id, “transactionProducts” with the variable ecommerce.purchase.products and “ecomm_totalvalue” with the variable ecomm_totalvalue
- create another own variable, this time of Custom Javascript type and name it ”price_netto“. Insert the code in it:
function(){
    try{
        var value = {{ecomm_totalvalue}};
		var netto = 0;

        netto = value / 1.2;
        return netto;
    }
    catch(e){
    }
}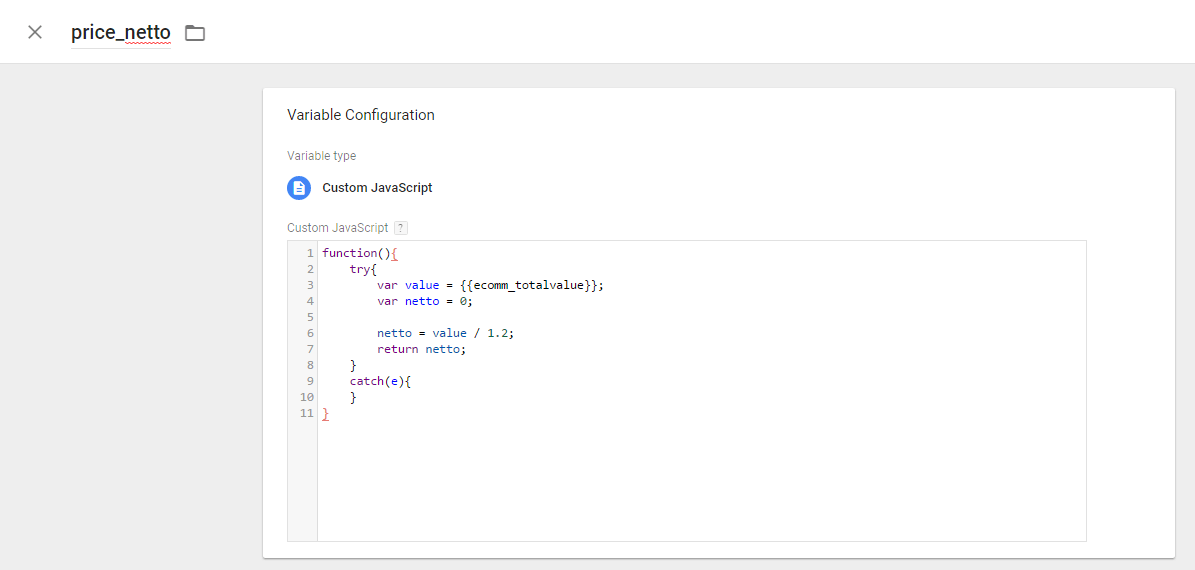
- create another own variable in GTM of Custom JavaScript type named productList and insert this code in it:
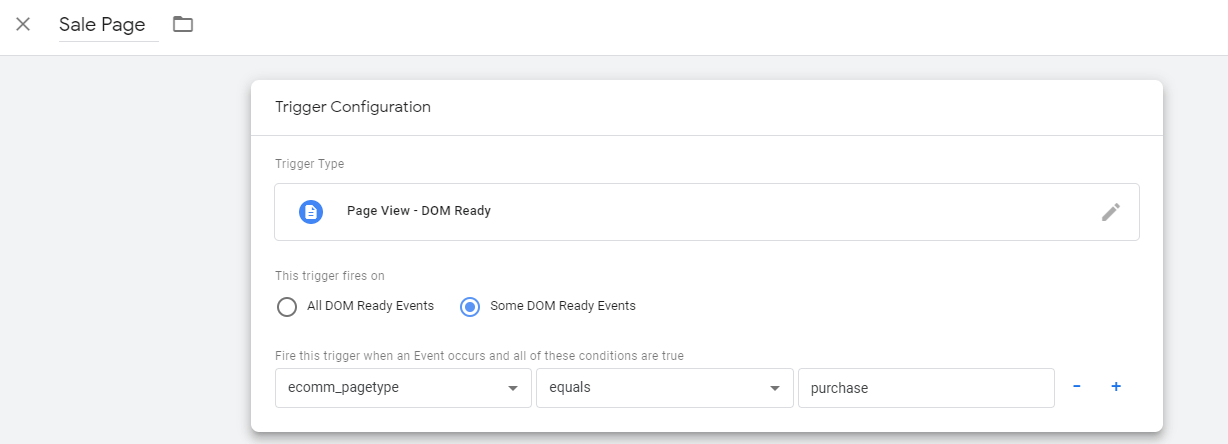
function(){ try{ var list = ""; var tp = {{transactionProducts}}; var x = 0; if (tp){ for (x=0; x<tp.length; x++){ list += tp[x].name; list += ", "; } } return list; } catch(e){ } } - in Tag Manager create a new trigger named Sale Page. This trigger will be for DOM ready ”Some DOM Ready Events“ in which ecomm_pagetype is equal to the value “purchase“

- create a tag for tracking sales “Affil Dognet – sale tracking“ as custom HTML where to insert the sale tracking code. The trigger is Sale page. In enhanced settings, set up the tag so that it is run only once per page.
- publish all changes
If necessary, contact us, we can also set up GTM for you 😉
Click tracking code
”XXXXXXXXXXX“ needs to be substituted for your account ID, as does “YYYYYY“ for your campaign ID.
<script type="text/javascript" id="pap_x2s6df8d" src="https://login.dognet.sk/scripts/fj27g82d"></script>
<script type="text/javascript">
PostAffTracker.setAccountId('XXXXXXXXXXX');
try {
var CampaignID='YYYYYYYY';
PostAffTracker.track();
} catch (err) { }
</script>
Sale tracking code
”XXXXXXXXXXX“ needs to be substituted for your account ID, as does “YYYYYY“ for your campaign ID.
<script type="text/javascript" id="pap_x2s6df8d" src="https://login.dognet.sk/scripts/fj27g82d"></script>
<script type="text/javascript">
PostAffTracker.setAccountId('XXXXXXXXXXX');
var sale = PostAffTracker.createSale();
sale.setCampaignID('YYYYYYYY');
sale.setTotalCost({{price_netto}});
sale.setOrderID({{transactionId}});
sale.setProductID({{productList}});

PostAffTracker.register();
</script> 


